Print Ready Artwork
Once you have an idea of the type of binding you would like for your presentation, you need to prepare the artwork for the contents accordingly. We strongly recommend to use a software dedicated to layouts such as InDesign. First, you need to set up the foundations considering a few important points. Then you will have to make sure you work with good enough elements for the artwork and lastly you will need to export with crop marks and bleed.
COLOUR SPACE
COLOUR SPACE
Convert all RGB and Pantone images and swatches to CMYK. Your files should be supplied in CMYK – these are the four colours used in printing. Remember RGB is for screen. If your files are not CMYK your colours can be interpreted incorrectly during the ripping stage meaning that some vivid, bright colours on your screen could come out slightly darker or murky. Usually there’s not much variance but it’s something to be aware of, especially if you are colour critical.
SETTING UP ARTWORK
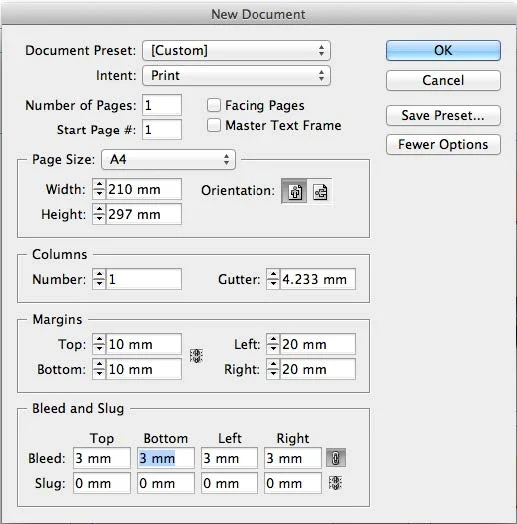
Example of how to set an A4 document up with bleed in InDesign.
Setting up artwork for a book
Open InDesign and create a new document.
- Set the size and orientation
- Set up 3mm bleed all around your document
BLEED
We cannot print to the edge of the paper. Therefore, we will print onto a slightly larger sheet of paper and trim down to size. The trim line is represented by the Black line all around the page. When setting up your file ensure you set a bleed of 3mm around the outside of your document. If using InDesign this setting appears in the “Document Setup” window. The bleed is represented by the red line all around the page. If your artwork has elements that go right to the edge of the page, bleed is extremely important. You will need to bring these elements out to the bleed line that is 3mm larger than our document size. This just ensures that when we trim down to size you won’t get any white borders around your elements because we have allowed for the document to shift slightly (this is typical in printing).
Margins and “safe zones”
When you are setting your files for print you need to be aware of your margins and “safe zones”. Specifically when designing for a book and a certain kind of binding it pays to always check on the product pages show the binding will affect your contents. “Safe zones” are the same concept as bleed, except inside the document. You should always allow a minimum of 8-10mm around the entire inside of your document to allow for shift. If your text/images are too close to the edge you are risking losing some of this information when we trim down to size. As a rule of thumb, again depending on your selected binding method, you should allow for a 15-20mm margin on the spine edge of your document. Some binding methods won’t open flat meaning that if your text is too close to the spine edge it will be very difficult to read.
BOOK LAYOUTS
Double Sided Printing Layout
Layout
- Remember – your book will START with the first page on the RIGHT hand side.
- Do NOT submit your cover, end papers and contents as one document. These MUST be supplied as separate files/PDF’
- Most of the bindings that we do have end papers so there will be a plain page at the beginning and the end of your book. Again, this does not need to appear in the PDF. If you wish for your end papers to be printed please talk to your account manager.
- As mentioned above, please leave between 15 and 20mm margins from the spine edge so the stitching doesn’t affect the content. PLEASE CHECK on the products pages the artwork requirements as some binding require bigger margins than others! If the printing is double sided, the spine edge will be first on the left, then right, then left, then right… etc.
- Always add a blank page where blank pages are required.
Please ensure all images and files are 300dpi (Dots Per Inch – also known as PPI, Pixels Per Inch). We have state of the art printers – however images that still look good on screen at only 72dpi or less than 300dpi become pixelated and appear blurry when printed.
LEFT: Notice the difference in quality from 72dpi to 300dpi. Generally images grabbed from the internet are 72dpi and will
still look good on your screen. Printers require images at 300dpi or they will print pixelated and blurry